Thursday, December 17, 2015
Tuesday, December 8, 2015
Beauty In Blues Mini Album J & S Hobbies and Crafts Design Team Project

For sale on eBay - http://www.ebay.com/itm/252205485751?ssPageName=STRK:MESELX:IT&_trksid=p3984.m1555.l2649
J&S Hobbies and Crafts store -
http://jshobbiesandcrafts.com/J&S Hobbies and Crafts eBay - http://stores.ebay.com/JS-Hobbies-and-Crafts?_trksid=p2047675.l2563
J&S Hobbies and Crafts Blog - http://jshobbiesandcrafts.com/?page_id=506
J&S Hobbies and Crafts items used :
Designs By Shellie BEAUTY IN BLUES 12 X 12 PAPER PAD
Magnets 1/4″ X 1/4″ X 1/16″ Thick
Flat back pearl “IVORY DOME SHAPED” – 20 PACK 1/4″ X 1/4″ X 1/8″
Flat back pearl “IVORY FANCY” – 20 PACK 7/16″ X 7/16″ X 1/8"
Flat back pearl "WHITE FLOWER” – 20 PACK 1/2″ x 1/2″ x 1/8"
Designs by Shellie Resin Oval Frame - Pearl Blue
DARICE-Bling On A Roll
KAISERCRAFT - Paper Blooms -white
Art Glitter Designer Glue
RANGER - Inkssentials Glossy Accents
Scor-Tape - 1/4in
You can follow me on Facebook:
https://www.facebook.com/TerrysScrapbooks?ref=hl
Ebay:
http://www.ebay.com/usr/dn1948
You tube :
https://www.youtube.com/watch?v=kgzjbsPPVyw
Tuesday, December 1, 2015
Silver and Gold Christmas Album Reneabouquets DT project for December

Reneabouquets Etsy Shop
Reneabouquets Facebook Page
Items from Reneabouquets shop:
So Shabby Ivory Chiffon Large Flower,
Khaki Chiffon Pearl & Rhinestone FlowerTiny Treasures Glistening Silver Snowflake Butterflies
Timeless Rhinestone Button- Gold
Large Snowflake Rhinestone and Pearl Button
Sheer Romance Lace In White
Elegance Lace In Ivory and Gold
You can follow me on Facebook:
You can follow me on Ebay
Thursday, November 19, 2015
Tuesday, November 17, 2015

Sunday, November 15, 2015
DESIGNS BY SHELLIE CLASSIC CHRISTMAS TRADITIONS HOLIDAY TRAIN
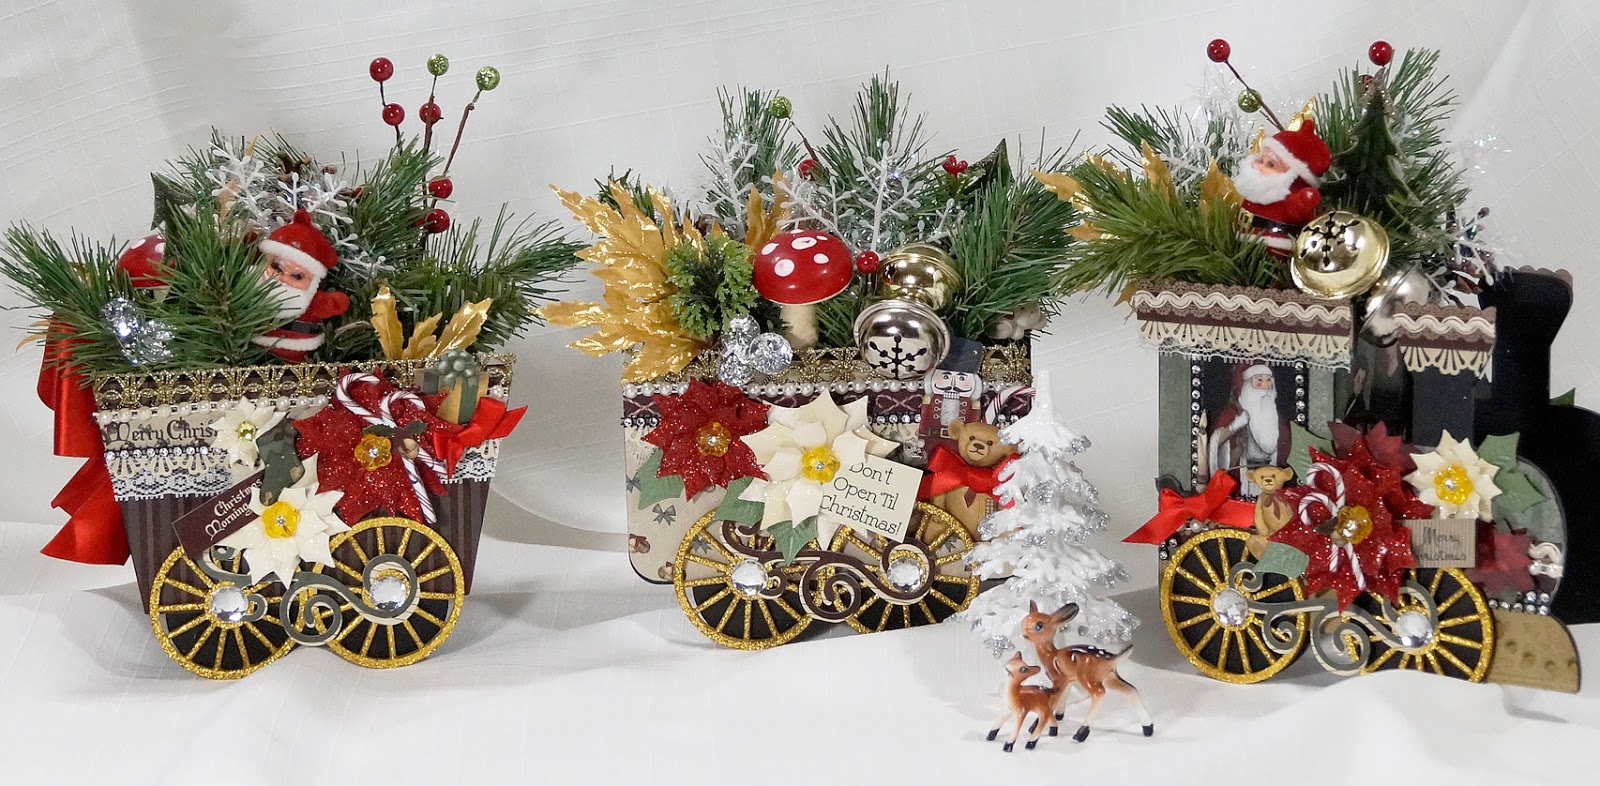


I made up DESIGNS BY SHELLIE CLASSIC CHRISTMAS TRADITIONS HOLIDAY TRAIN.
I followed Shellie's Tutorial and changed it just a little. My grand
son is train struck He just loves choo choo's. So this project is
perfect fot this Christmas ! smile emoticon
You can find the tutorial here:
https://www.youtube.com/watch?v=5XdwSIU0RQQ
You can find the tutorial here:
https://www.youtube.com/watch?v=5XdwSIU0RQQ
Monday, November 9, 2015
J & S Hobbies and Crafts Semi-Finalist project.
Here is my submission to J & S Hobbies and crafts Semi Finalist Design Team Auditions
The instructions for how to make it follow the pictures.
You can buy the Designs By Shellie products to make this ornament "Here"

The instructions for how to make it follow the pictures.
You can buy the Designs By Shellie products to make this ornament "Here"


This pretty Christmas ornament is a fun project that can be completed in one afternoon.
Materials list:
From Designs by Shellie Classic Christmas Traditions 12 x 12 paper you will need
-2 sheets #17 Ornate-Tree, and 1 sheet #19 Sentiments
2 Designs by Shellie oval pearl frames
2 of Julie Herrick's porcelain poinsettias
12 inch piece of 1/4 inch green ribbon
Small piece of 1/8 inch red ribbon (Bears bow tie)
13 Small 1/8 inch red acrylic crystal gems
34 pieces 8mm beads
Glitter glue in different colors - green, red, white, gold, black
small piece of silver tinsel (about 3-4 inches)
E600 glue
Ranger Inkssentials Glossy Accents
dimensional foam pop up tape squares or dots
Tools:
Scissors. (Small scissors recommended for fussy cutting)
String or needle and strong thread for stringing beads.
Directions
1- String the beads onto thread and tie the ends together to make a tightly closed circle of beads.
Rough up the back side of both oval pearl frames with some course sand paper. Run a line of e600 glue to the back side of one oval frame about 1/8 inch away around the edge of the oval opening. Stick the center of the 12 inch piece of green ribbon at the center of the top of the frame, be careful not to get the other parts of the ribbon in the glue (just the center of ribbon in the glue). Lay the bead circle you made around the oval on top of the glue, and over the ribbon. Let dry. This is the front part of the ornament.
2- Cut out the sentiment of your choice from the #19 sentiment sheet of paper. Cut it in an oval shape 1/4 inch larger than the opening of the frame so that the sentiment shows centered in the frame.
3- Cut an oval section of the Christmas tree from #17 Ornate-Tree 12 x 12 paper. Cut it 1/4 inch larger than the frame opening, (as in step 2). (I choose the top of the tree and cut it so it showed a little off to the left side of the opening in the frame).
4- Fussy cut out the teddy bear image grouping from one #17 Ornate-Tree paper. And then cut the teddy bear image alone with out his friends from the second sheet of #17 Ornate-Tree paper. Apply dimensional foam pop ups to the back side of both your fussy cut pieces. (Don't bother putting the pop ups on the candy canes. )
5- Adhere the single fussy cut teddy directly over the top of the teddy that is still in the fussy cut image group. Line him up as perfectly as possible over the other teddy. Apply some the different colors of glitter glue to accent both the Christmas tree and the teddy group. I use a toothpick to apply small amounts of glitter glue to the images. Tie a small bow with red ribbon and glue it over the teddy's bow. Glue all but 4 of the Small red acrylic crystal gems on the tree like ornaments and Let dry.
6- Place the dimensional image (Teddy and his friends) on top of the oval cut out of the Christmas tree, (do not adhere yet). Place it as you would like it to show up inside the frame. Then set the frame with the beads attached on top, to see what you might have to cut off your dimensional teddy group, so that it will fit inside the frame. (I had to cut off teddy's legs and a bit of the gift box). Cut off the necessary parts.
7- Using Glossy Accents, glue the oval sentiment to the frame that does not have the beads so that the sentiment shows through the frame opening. This is the back side of the ornament. Next glue the oval cut out of the Christmas tree over the back side of the oval sentiment paper making sure it is straight up and down. This will show through the front side of the ornament.
8- Now it's time to glue on the front frame that has the beads attached. Put a little glue on the attached ribbon where it will fold up over the beads to the top of the frame. So that both ends of the ribbon are over the top point of the frame. This is the ornament hanger. Run e600 over the beads and over the folded up ribbon, (so the ribbon is held in the glue), and adhere it over the back part of the ornament, lining up the two frames back to back with the beads in the middle separating the 2 frames. Let dry.
9- Adhere the fussy cut dimensional teddy group where you like it inside the opening of the front frame on top of the Christmas tree. Glue down to the Christmas tree background the very ends of the candy canes, if you like.
10- Glue on the extra 4 red acrylic crystal gems on the frame front and back as you see in the picture.
11- Using E600 glue the poinsettias onto the front of the frame as you see in the picture. Let dry.
12- Tie a not in the green ribbon so it rests all the way down to where it attaches to the beads. This will change the direction of the way the ornaments hangs. Then tie a knot above4 inches or so...to form the hanging loop.
Voilà! Finished!
-Terry
Couture Creations - Hearts Ease Mini Album

Couture Creations "Hearts Ease" paper were used in making this Scrapbook Mini Album It is my Reneabouquets DT project November.
Monday, November 2, 2015
Monday, October 12, 2015

Sunday, October 11, 2015
Graphic 45 Mon Amour Mini Album Tutorial Lists
Papers needed:
Twenty one pieces black cardstock (I use Bazzill)
Three pieces rose red colored cardstock (I used Recollections) (suggest Bazzill's Maraschino)
Two piece Bazzill's Vanilla colored card stock
One piece minty light green colored card stock. (Bazzill's -Lilly Pond)
One piece Bazzills French Vanilla card stock
Graphic 45 - Mon Amour Collection - 12 x 12 Paper Pad
Plus these single sheets of 12 x 12 paterned paper from the same collection
One piece - Precious One
One piece - True Love
One piece - Mon Amour
Two pieces - Dearest Darling
Graphic 45 - Mon Amour Collection - Journaling and Ephemera Cards
Chipboard 52 pt. Extra Heavy Natural Four piece- 7 1/4" x 9 1/4" two piece 7 1/4"x3"
Items needed:
Aleene's Crystal Clear Acid Free Tacky Spray Glue
Aleene’s Acid-Free Tacky Glue
I/4" Score tapebrayer
I/4" Score tapebrayer
score board
Heartfelt Creations Arianna Blooms Die
Heartfelt Creations Arianna Blooms Cling Stamp Set
Heartfelt Creations Classic Leaf Die
Heartfelt Creations Open Leaf Cling Stamp Set
VersaColor Pigment Inkpad, Cinnamon
Stampin Up ink, Certainly Celery
Distress ink, Old Paper
Twelve pieces 8mm x 1mm disc magnets
Oval die 3 1/2 "x 4 1/2"
Spellbinders die Labels Four Small
Ticket corner punch. (optional)
7"x5" embossing folder (optional)
Tyveck (envelope)
2" Pink lace I bought mine at Reneabouquets.com (Shabby Dream Pink Cotton Crochet Lace)
1 3/4" Black lace I bought mine at suhafuha etsy (BLACK Delicate Geometric Pattern Venise Lace Trim)Chipboard dress form
1 3/4" Black lace I bought mine at suhafuha etsy (BLACK Delicate Geometric Pattern Venise Lace Trim)Chipboard dress form
Scraps of lace
120" of 3/4 inch black satin ribbon
Two piece of 6" paper doily
One package black glitter adhesive dots
Three pieces pink acrylic adhesive gems
close pins (clamp)
12" ruler
Flower shaping tools
Optional:
Art Glitter Adhesive and Ultra Fine Metal TipPost-it notes
Art Glitter Adhesive and Ultra Fine Metal TipPost-it notes
Cut from black card stock:
One piece-12"x 7" -score at 4" and 11 1/2" and 11 5/8 " on one 7" side.
0ne piece- 10"x 3 1/2" -score at 1/2" on both 3 1/2" sides
Nine pieces - 9"x7"
0ne piece- 9"x 6 1/2" -score at 4 1/2" down the center.
One piece-9"x 8" -score 1/2" and 3/4" and 1" on both 8" sides also score 1/2" on one 9" side
0ne piece- 8"x7" -score at 1/2" and 5/8" on one 7" side.
One piece- 8"x6"
One piece- 8"x6" -score 1/2" on one 6" side
One piece- 8"x 5" -score 1/2" on both 5" sides
0ne piece- 7 1/2"x 5 1/2"
One piece- 7"x 6 1/2" -score 1/2" and 3/4" on one 6" side.
0ne piece- 7"x 5 1/2" -score 3 1/2" down the center.
0ne piece- 7"x 5" -score 1/4" and 1/2" on one 7" side of the paper.
Eight pieces- 7" x 4 1/2" -score at 1/2" on one 4 1/2 " side.
Three piece- 7"x3" -score 1/2" on both 3" sides.
Five pieces- 6 1/2" x 4 1/2"
One piece- 4"x6" -score 1/2" and 3/4"
One piece-6 1/2" x 3 1/2" -score 1/2" on both 3 1/2 " sides
Two piece-5 1/2" x 5"
Three piece- 5 1/2" x 4"
six pieces - 4 1/2"x 4 1/2"
Two pieces - 3 1/2" x 1 3/4"
Three pieces 1"x2" -score at 1" down the middle.
Friday, October 2, 2015
Monday, September 14, 2015
Saturday, August 22, 2015
Monday, August 17, 2015
Saturday, August 1, 2015
News!! I have the lucky privilege to be a Guest Design Team Member For Reneabouquets during the month of August 2015.
For my project I did some tear off calenders.
Reneabouquets Shop-http://www.Reneabouquets.com
Reneabouquets Etsy Shop-https://www.etsy.com/shop/Reneabouquets
Reneabouquets Facebook Page-https://www.facebook.com/Reneabouquet...
For my project I did some tear off calenders.
Reneabouquets Shop-http://www.Reneabouquets.com
Reneabouquets Etsy Shop-https://www.etsy.com/shop/Reneabouquets
Reneabouquets Facebook Page-https://www.facebook.com/Reneabouquet...
Items from Reneabouquets shop:
Shabby Dream Pink Lace
Sheer Romance Lace White
Trim Dainty Champagne lace
Trim Elegance Ivory and Gold lace
Peacock Dragonflys
Chiffon pearl & Rhinestone Flower
Shabby Pink Roses Glitter Glass Butterfly
Shabby Blue Roses Glitter Glass Butterfly
Cherub Die cuts
Glass Microbeads -silver
Glass Microbeads -gold
Prima Shabby Chic Treasures Resin Ballerina
You tube video:
https://www.youtube.com/watch?v=BzNvBdTACeI
These calenders are for sale on eBay:
http://www.ebay.com/usr/dn1948


http://www.ebay.com/itm/261988181891?ssPageName=STRK:MESELX:IT&_trksid=p3984.m1555.l2649


http://www.ebay.com/itm/261988187180?ssPageName=STRK:MESELX:IT&_trksid=p3984.m1555.l2649

http://www.ebay.com/itm/261988191658?ssPageName=STRK:MESELX:IT&_trksid=p3984.m1555.l2649

Monday, July 13, 2015
Sunday, July 5, 2015

Monday, June 22, 2015
I created a mini album useing Graphic 45 Gilded Lily papers.
I fell in love with these gorgeous Gilded Lilly papers the moment I saw them.

It measures 9 x 7 x 3 1/2 inches


Page 1

Page 1


Pages 2 & 3


Page 2 opens with a pocket

Page 3

The wallet inside the lace pocket of page 3

Page 4 opens up like page 2.

2 photo mats inside the doily envelope of page 5

Lots of photo mats in the lace pocket of page 6.

Slide pictures inside the frames on page 7

Page 8 opens.


Sunday, June 14, 2015

Friday, May 29, 2015
How to make Graphic 45 Home Sweet Home scrapbook mini photo album.
I have put up my first tutorial on you tube.

How to make Graphic 45 Home Sweet Home scrapbook mini photo album.
Click this link to watch: https://www.youtube.com/watch?v=5pj3eyi1mGw
You will need:
Graphic 45 - Home Sweet Home Collection - 12 x 12 Paper Pad2 sheet 12 x 12 Double Sided Paper - Granny's Quilt1 sheet 12 x 12 Double Sided Paper - My Sunshine
1 sheet 12 x 12 Double Sided Paper - Home Sweet Home
2 sheets 12 x 12 Double Sided Paper - Garden Fresh
2 sheets 12 x 12 Double Sided Paper - Farmers Market
Home Sweet Home Collection - Die Cut Chipboard Tags - One
Home Sweet Home Collection - Die Cut Chipboard Tags - Two
27 sheets black card stock
Scrap piece of yellow card stock
4 1/2 x 6 1/2 piece of red card stock
Heartfelt Creations cling rubber stamp - Tattered Blossoms
Heartfelt Creations -Tattered Blossoms die
Heartfelt Creations Cling Rubber Stamp -Classic Leaf
Heartfelt creations Classic Leaf Die
Ticket Corner punch.
Scalloped Borders Two Card Creator dies.Anna Griffin - Flourish Emblem dieMartha Stewart Punch, Deco Shells
Spellbinders -Garden Weave die
Ten 6mm x 1mm disc magnets
Two 15 x 1 mm disc magnets
26 inches red satin ribbon 1 1/2 inch wideGingham ribbon in 3 colors
60" of red.
60" green.
35" blue
Acid free glue
Acid free spray glue
Score tape
Glossy accents
Liquid perfect pearls - Buttercup
Tyvek -envelope
Link to Hearfelt Creations Flower shaping tutorial
https://www.heartfeltcreations.us/howto?view=videos&videoID=70


Saturday, May 9, 2015

Subscribe to:
Posts (Atom)