 I made my own paper mache eggs, (I tell you how I did it later in this post) and then decorated them with paint, beads, flowers, ribbons, mini plastic eggs, flocked bunnies, and some of Reneabouquets laces, trims, chunky glitter, A Summer Set Butterfly, and Renea's Sweet Vintage Flower Fairy Die Cut.
Then I hot glued the yellow one on to a glass candle stick and the pink one to a small cut glass bowl. They are so bright and cheerful! I love the Sweet Vintage Flower fairy peeking out from her magical egg.
They make me happy to look at them. 😀
I've done a picture tutorial on how I created my own paper mache eggs.
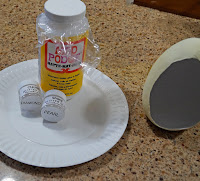
First I bought one of these...
I found it at Walmart, opened it at home and of course I ate the candy.
I have made lots of things with paper mache over the years, so it was natural for me to want to make my own eggs rather than buy ready made ones. It's a lot less expensive too! Even after you buy the plastic egg you are saving money. The 4 inch paper mache eggs I had found cost about 4$ each, and they didn't come with a sweet treat. The plastic egg with candy cost about $7. I know that's a lot more than $4, but you can make hundreds of paper mache eggs with it.
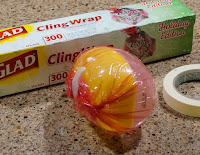
I wrapped the egg in plastic wrap to make it easier to separate the plastic egg from the paper mache egg that I will create over the top of it.
I secured the ends of the plastic wrap with some tape. I tapped the bulky ends to the yellow or bottom of the plastic egg. The yellow side has a flat spot. I wanted the back of my egg to be curved and egg shaped. Plus I know I'm leaving one side open to create the diorama opening. I'm putting the bulky taped ends of the plastic wrap over the flat spot on the yellow half of the plastic egg because I won't be covering that spot with paper.
Next I tore strips of regular printer paper. I had lots of half sheets of this paper saved after cutting out shipping labels I had printed from my computer. So I used that, but any paper can be used, as long as it is about the same weight. News paper is the traditional paper used for paper mache.
I put about a 1/4 cup of glue in a bowl, and added about a cup of water. Mixed that together. It looks like milk.
Put some of the torn paper strips in to the glue/water mix. I like to use some dry strips after I get some layers of wet strips on. So I didn't put all the paper in at the same time. The dry strips absorb some of the water from the wet paper strips and helps things dry a bit faster. More paper strips can always be added to the glue mix if needed.
I start layering the paper strips that have been soaked in glue over the egg, in different directions, covering evenly and smoothly till it's covered with 5 or 6 layers of paper. I leave an oval shape uncovered on one side of the egg. That will be the opening for the Fairy and Butterfly.
Cover the bowl of glue/water mix to save it for later. Let the paper mache egg dry. It can take 8 hours or more to dry. I left mine standing up right over night. In the morning it was almost dry. Just the bottom was still a bit wet. I should have waited until that had also dried, but I didn't....
I cut the paper in a straight line down the center of the bottom. This is to be able to open the paper mache and get the plastic egg out.
I did not cut a hole. It just looks like that because the paper was still wet, so as I started to pull the paper open it all tore and squashed open like that. If I had let it dry properly it would have been a nice straight cut. I didn't worry because I knew I could fix it.
I carefully pulled the plastic wrap open and away from the plastic egg. The point is to get the plastic egg out of the plastic wrap. So I took off the tape and started to pull open the paper and plastic wrap and work out the yellow half of the plastic egg. Carefully easing open the paper mache.
Wala! I've separated the yellow half of the pastic egg from the clear half.
Next to get out the clear half.
I cut up the back/bottom some more to give it more room to open and pulled it out. And also pulled out the plastic wrap.
Now I'll repair the bottom with the left over glue/water mix and some more torn paper strips.
Both inside and out.
Looks Fab!! Let dry.
Clean up the opening so it's pretty. I know I'm covering these edges with some trim so it doesn't have to be perfect.
Now get out the joint compound. We had this left over from work done on out house. I just needed a little. A little water too.
 Using my finger I smeared on the joint compound. Then with the same finger dipped in water I smooth it out more. I covered the whole outside of the egg like this.
  Let it dry. A heat gun can speed the drying time, Then I sand it with 150 grit sand paper. This fills in dips and edges, it smooths out the surface a lot more. Wipe the egg with a dry cloth to get
off the excess dust from sanding.
 Then I painted it with yellow mixed with white.acrylic paint.

I got out the glitter and Mod Podge. I used Reneabouquets Chunky Glitter- Diamond and Reneabouquets Shard Glitter Glass-Pearl.

After the glitter was dry I used Transparent 3d Gloss Gell. I patted it on with a spatula in random spots and sprinkled on some white beads. Then I stuck some larger beads on here and there by hand.
I had originally painted the inside of the egg blue. I changed my mind and decided to use torn pieces of old book pages. I tore them into approximately 1 inch pieces.
I painted Mod Podge inside the egg in a spot just a bit bigger than one inch.
Using the brush I picked up a piece of the paper and stuck it in, then smoothing it out with the brush on to the Mod Podged spot and Mod Podged over the top....repeat in different spots until it was all covered inside.
Then I coated inside with more glitter.
But you can decorate any way you like!
Items used from Reneabouquets shop
Sweet Vintage Flower Fairy Die Cuts
Reneabouquets Trim-Ivory Pleated Tulle
Renea Bouquets Chunky Glitter Diamond
Reneabouquets Shard Glitter Glass-Pearl
Reneabouquets Trim- 4.5 Inch Wide Floral Embroidered Lace In White
Reneabouquets Trim-Elegance Ivory & Gold Lace
Reneabouquets Shop-http://www.Reneabouquets.com
Reneabouquets Etsy Shop-https://www.etsy.com/shop/Reneabouquets
Reneabouquets Facebook Page-https://www.facebook.com/Reneabouquet
Thank you so much for stopping by!! Happy Crafting!! ❤️


Terry, these are fantastic!!
ReplyDeleteThank you Sue!! 😀
DeleteHi Terry,
ReplyDeleteAgain and again you do iT!!!
Really beautiful !!
Mvg Gina Belgium
Thank you for being so sweet to me Gina!! ❤️
DeleteVery beautiful. Appreciate your hard work. Thanks for sharing.
ReplyDeleteThank you Lisa! 😀
ReplyDeleteAmazing, Terry! Thanks for sharing!
ReplyDeleteThank you Brandy!
DeleteAmazing, Terry! Thanks for sharing!
ReplyDeleteI know I'm late to this party, it looks like you did this in 2017, and yet here I am in 2023, but my question is could you have just used half of the egg to paper mache it? I'm going to try your way and then use half an egg,,,going to Walmart today to get me some candy....you did a great job, very pretty....really nice...
ReplyDelete